home about mentions resources work shop

Saturday 22 December 2012

Happy Holidays!


I'm hoping to be a lot more active here in the new year and I'm planning some big changes to my blog (maybe somewhere new for me) and work. Do hope to see you back here then. In the meantime, may I wish you a very happy Christmas and that 2013 is a good year for you all!

PS - For font lovers out there. Isn't 'Happy Holidays' written in the most beautiful typeface. It's called Mission Script by one very talented James Edmondson. And you can pay what you like for it! Yes, anything you want! This and other beautiful pay-what-you-want fonts can be found over at the Lost Type Foundry.
.

Thursday 12 April 2012

a virtual rest


Anyone who's ever followed any of my blogs will know that I'm not the most consistent of bloggers, with frequent big gaps in my posting regularity. But the alert amongst you may have realised that it's been unusually long since my last post in mid-February.
There's no one single reason for this. Maybe it's just a touch of virtual fatigue - I simply can't be faffed with all the blogging and tweeting and flickring and pinteresting, or following this blog or that blog and leaving comments everywhere, or editing photos and uploading for a post which always takes an age. Maybe I'm just tired of all this virtual etiquette that one seems to have to follow along with simply to get noticed and so my Etsy shop will thrive. Maybe I simply don't have time, now that Leo, my nearly two-year-old son needs that much more attention each day and I just want to make the most of these precious moments. Or maybe it's because there is too much reality to deal with here in Greece right now, when pensioners are killing themselves in a country where you simply don't do that and my husband doesn't know if he'll have a job three months down the line... (actually there is a big change coming up, but more of that in time)
It's a bit of all of the above, but right now I prefer to spend my time in the real world and when time allows to do nothing more than a relaxing bit of knitting or crochet which I've recently found a renewed passion for.
In time, I hope to be back with something fresh and new to share with you, and to reacquaint myself with my lovely circle of virtual buddies - who are among the most talented and inspiring people I know (you know who you are girls) but until I have more time on my hands to be able to dedicate to a project properly I'll be limiting myself to a few posts on Facebook and a few pins on Pinterest.
Hope to see you later in the year!

Tuesday 28 February 2012

the graphics fairy

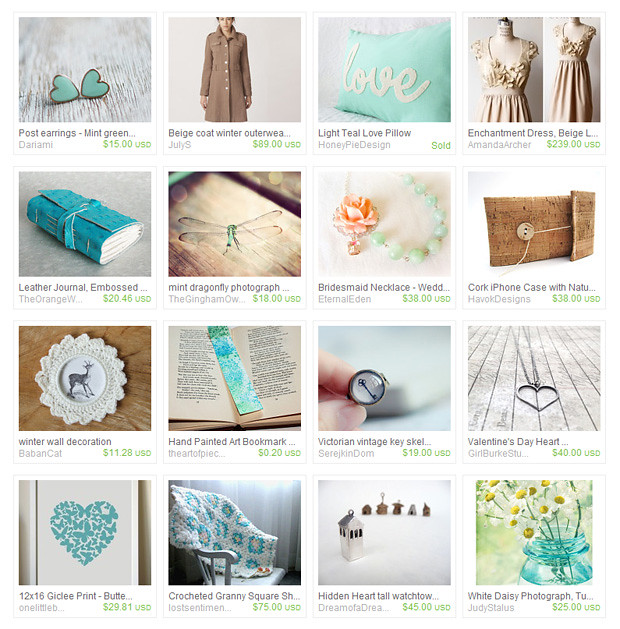
The Graphics Fairy is an amazing and seemingly endless resource of around 2,500 FREE clip art images and vintage printables, to use for craft projects, collage, scrapbooking etc! Karen, the graphics fairy herself, has generously been adding vintage image downloads every day since 2007! Above you can see a few of the images that I selected to use for this digital collage I created in Photoshop called 'Let Them Eat Cake'. Watch the animation to see how it develops...
Stage 1 First I place the image of Marie Antoinette, cropped from it's original frame, slightly off-centre.

Stage 2 I lightened the image using the curves function and start placing a few cropped images of flowers.

Stage 3 More flowers... until I feel her 'wig' is just at the right ridiculous height!

Stage 4 Some more flowers and then I put a bird on it... of course!

Stage 5 I finish off embellishing Ms Antoinette's wig, then I give her a hand holding a cup of french 'chocolat'. The swirl of steam is a glyph from Parfumerie Script Ornaments!

Stage 6 I need to give her a background. I've used the back of an old airmail envelope, from another amazing image resource site, Fuzzimo. So lucky to have found one with the red, white and blue stripes, for that extra bit of Frenchiness. The grid paper and masking tape strips are also from Fuzzimo. (ignore the scissors outline - that wasn't meant to show up yet :)

Stage 7 I build up the background layers for a bit of depth. I add a strip of (my own) pattern behind the masking tape, a vintage ticket (from my lovely friend Dawn's fantastic ticket collection) and some faded astrology symbols from my own brush collection.

Stage 8 A bit more pimping up of the background - I add some larger scrolls from the Parfumerie Script Ornaments font, some circle shapes for balance and some nice blood stains - we know where this little lady ends up!

Stage 9 She's nearing the chopping block now, so let's give the executioner a helping hand by telling him where to cut! Another bird here, a couple of butterflies there... nearly finished. Oh, and as if the hair isn't quite extreme enough, let's stick a cake on top and the Eiffel Tower sticking out at the side!

Stage 10 Marie's blindfolded and rouged, ready for the guillotine! Finally, I add a lovely flower and scroll motif with the words 'Let Them Eat Cake'. She really took the biscuit!

If there are any links I have not provided for images from The Graphics Fairy, that's because I couldn't find them again (or couldn't spend the time looking for them again - this blog post alone has taken nearly as long to complete as the collage itself!). And that is really my one and only tiny criticism of the site. The Graphics Fairy is basically a blog and truthfully the format just cannot handle the amount of stuff on there! It's very slow to load and searching is a bit of an effort, although Karen's recently added a basic search function to help matters. But we are talking about a huge one-woman effort here and I know how difficult and costly a dedicated website would be to set up! I just hope one day this becomes a reality, but until then set some time aside to have a good root around over there!

Thursday 23 February 2012

a feast for the eyes

Sigh... this has been my first post in a loooooooooong while! I simply don't seem to have time! A poor excuse I know, but Leo is more demanding than ever (mostly in a good way) but his hour in the park has now turned into two hours in the park, and he rarely lets me just sit at the computer for long before he's tugging at my leg begging to sit on my lap or wanting me to play with him. I get a break in the afternoon while he's napping, but by the time I've had my lunch, answered a few emails and done a scant bit of housework he's awake again and so starts the evening round. I'm not complaining - far from it, I cherish every moment with him - but it does mean that blogging has to take a back seat for a while.
Anyhoo... I just couldn't not post about the most gorgeous food photography I discovered this morning via a link from Creature Comforts. I am neither a foodie nor a vegetarian, but there is something so 'nourishing' for the soul to be found in great food styling. Pure Vegetarian is a beautiful blog featuring recipes from Lakshmi Wennäkoski-Bielicki, a lady with a very spiritual attitude towards food, and a special talent for photographing it. Just feast your eyes on these...

[ ALL IMAGES Lakshmi Wennäkoski-Bielicki ] 

Wonderful eh! Bet that's got your mouth watering! You can find a lot more inspiring images over on Lakshmi's blog and the above recipes by clicking on the relevant image.

Thursday 26 January 2012

secretly in love

Very happy to be part of this pretty treasury today...
[ CLICK IMAGE FOR LINKS ]

Wednesday 25 January 2012

a bit of inspiration

A few inspiring pins for a dreary Wednesday afternoon!
[1]  [2]  [3]  [4]  [5]  [6]

[1]  [2]  [3]  [4]  [5]  [6]

[1]  [2]  [3]  [4]  [5]  [6]

Tuesday 24 January 2012

blog me beautiful

I've been tweaking away at my blog since the new year started in an effort to try and make it look nicer and more coherent. Not being able to afford a pro to pimp it up and having very little code experience it's a long and slow process and waaaaaay off being what I want it to be. But little by little I hope one day to have the blog of my dreams!
In the meantime, I've added a new list to my sidebar entitled 'The Most Beautiful & Inspiring Blogs'. It gives me something to aspire to! Here's what's on the list so far...
{ CLICK THE MAC FOR LINK }

A CREATIVE MINT

DOOR SIXTEEN

FORTY-SIXTH AT GRACE

HONEYPIE LIVING ETC

KINFOLK JOURNAL

QUIET GIRL

SANIA PELL

WISHWISHWISH
I do hope you enjoyed that little round up and find some inspiration somewhere today. I'd love your suggestions for more beautiful and inspiring blogs!

Wednesday 18 January 2012

eva juliet: new work

I was very excited to see this beautiful new range of prints from the very talented Eva Juliet on Etsy today!

Inspired by the Norwegian Rosemaling style...
Pick a number and add your own text...
I shall certainly be saving my pennies for one!

blogging tip: it's a rollover!

Following on from my triumphant post 'How to link an image to your email', I thought I'd show you the next cool trick I've learnt. And I promise you, this is very, very cool!
Seeing as Valentine's Day is just around the corner and it's my Mum & Dad's 50th wedding anniversary this year, I thought it apt to demonstrate this effect with a photo from their wedding day, just before they set off on their honeymoon. This is the original version, with no editing whatsover. It's not great quality and needed a lot of work. Roll the mouse over to see what I did...
Ta da! So, how do you make a rollover. Tis but simple my dear friends. (well, actually this took quite a bit of persistence and error-correcting on my part, but in the end, if you do the right thing, it's a sinch!) I referred to this quick tutorial, but I kept slipping up, so I want to tell you where I kept going wrong so that you don't make the same mistake!
You will need to put the images you want to use online. I posted mine on Flickr and made them private so that no one else can see them. Come back to Blogger and create a new post. Then copy and past the first bit of HTML into the HTML view of your post, exactly in the place where your want to place your image. 
Let's look at it bit by bit.
1 // IMAGE-DESTINATION-URL
This refers to the URL you want your image to link to if you click on it. I don't need to link it to anything so I have just put my own blog URL here, i.e. http://www.onelittlebirdstudio.blogspot.com 
2 // IMAGE-1-LINK
This will be the static image you see before you rollover. Now, this is the mistake I was making. You need to get the URL for your image. Do not copy and paste it from the browser bar. This will not work! You need to go to your photostream (if you are using Flickr) and right click on the image. You will see a list pop up and about halfway down you will see 'copy image URL'. Click that! Then come back to your new post and paste it into the HTML. 
3 // IMAGE-2-LINK
This is the image you want to see when you rollover with your mouse. Get the URL in exactly the same way as the previous step. Paste it in. 
4 // IMAGE-1-LINK
Exactly the same as step 2, paste in the URL for the static image.
That's it! It should work in exactly the same way as you see above. If you have any problems leave a comment and I'll try and put you straight.

Sunday 15 January 2012

free illustrated recipe


A while back I showed you this beautiful illustrated recipe from Eva Juliet, free for you to download. Illustrated recipes seem to be quite the thing. Here's another I found the other day on the lovely forty-sixth at grace blog, illustrated by Melinda JosieAnd on a side note you really must check out the Herriott Grace shop, if not for the amazing photography of their gorgeous products!

Even if you don't make them, this will look gorgeous on the kitchen wall!

from above

More playing around with tilt-shifting in Photoshop. Works really well looking down from above...
Photos can be viewed individually here.
Huge range of TTV frames available from Ocodo.

Saturday 14 January 2012

lettuce & yellow bird

A very pretty treasury today from Kasia...
[ CLICK THE IMAGE FOR LINKS ]

Friday 13 January 2012

pretty blatant

Typographic prints that mean what they say from Therese Sennerholt... (sorry Mum, this post contains some potty-mouth language)
I WILL TRY ANYTHING ONCE
SMALL THINGS
SHUT UP
JÄVLA SKIT [now you  know how to say son of a bitch in swedish]
On postcards...
...and notebooks too!

Thursday 12 January 2012

faking instagram pt.2

Following on from my previous post 'Faking Instagram', there was one more effect that I really like in Instagram that I wanted to show you - that sort of blurry-all-around-the-edges-with-the-focus-right-in-the-centre-so-everything-looks-sort-of-miniature. That is not the technical name. I have since found out the technical name for this effect is tilt-shift. I'll show you a before and after so you can see what I mean. 
Here is a photo of my sister-in-law Matina in Amsterdam some years ago, straight out the camera:
And here's the tilt-shift version. I applied the Earlybird action first.
You can find a quick tutorial for creating tilt-shift effects here. And some more of my experiments here. So there you go, some lovely fake Instagram effects to play around with! Enjoy!

faking instagram pt.1

I really like Instagram photos. Trouble is, I don't own an iPhone, and probably never will. So the next best thing is to just fake the damn things. I had a trundle around on the net and found Daniel Box who'd taken the trouble to make some rather convincing (and free) Instagram Photoshop Actions (thank you Daniel). I'll demonstrate the effects on a picture of my little boy, Leo. 
Here's the original photo straight out the camera:

And here are the 12 filters in the set:
Rather nice aren't they! The set also includes some of the frames that you see on Instagram pics. But what is missing is the waffle effect frame on the original photo up there. So I made one! You will need Photoshop -  just hit this button to download.
download

sally elford

I love mutual admiration! I had an email from Twitter the other day to say that Sally was now following me. I always check out any new follower so hopped on over to Sally's profile and then to her website. There I discovered her beautiful mid-century modern inspired screenprints and giclee prints. I immediately wanted to blog about them...
FISH POOL

FEATHERS AND FLORA (MUSTARD)
Imagine my surprise when I went to her 'news' section to see my own prints staring out at me! She'd beaten me to it! I wouldn't have known about that if I'd not followed the links, and I wouldn't have discovered Sally's beautiful work. In the few emails we have now exchanged, I find I really like Sally and feel we have much in common as artists. Social networking can be good sometimes!
MAGPIE'S TREASURE

DANDELION (MUSTARD)
Many of Sally's themes are based around nature, but she does have the odd non-nature inspired piece, such as this personal favourite of mine...
TIME FOR TEA
Be sure to have a look at more of Sally's fine work here.

Wednesday 11 January 2012

how to link an image to your email

If, like me, you are a complete dullard when it comes to anything codey or webby (we're talking HTML, CSS and all that palaver), then this should hopefully appeal. I recently found out how to link this image directly to my email. Meaning that when you click on the picture you go straight to a new email - to me! (go on, click on it, send me an email, go on). It's easy to add a picture as a gadget in your side bar, but how do you link a picture within a post? I now know and this is rather exciting to me. So I thought I would share with you how to do it.
First, create a new page or post and upload your image (I'm using my typewriter image). Now, select the HTML view. You will see lots of lovely code (scary huh!). This is where you need your glasses on. Look for the bit that sits between a pair of double quotation marks and starts with 'http:'. It's underlined in pink here:
[ CLICK TO ENLARGE ]
This is the HTML code for opening your picture in lightbox mode (click on the typewriter image above to see what I mean), which is the standard thing that happens when you click on an image in Blogger. But we want to link to our email instead. So we need to change this link. Select that bit of code (be careful to just select the text and not the quotation marks) and write mailto:youremailaddress, like this:
[ CLICK TO ENLARGE ]
Save and close. Voila! It's done. You can link images to another website by inserting their URL (include all the http bit) instead of an email address. Simple really.